


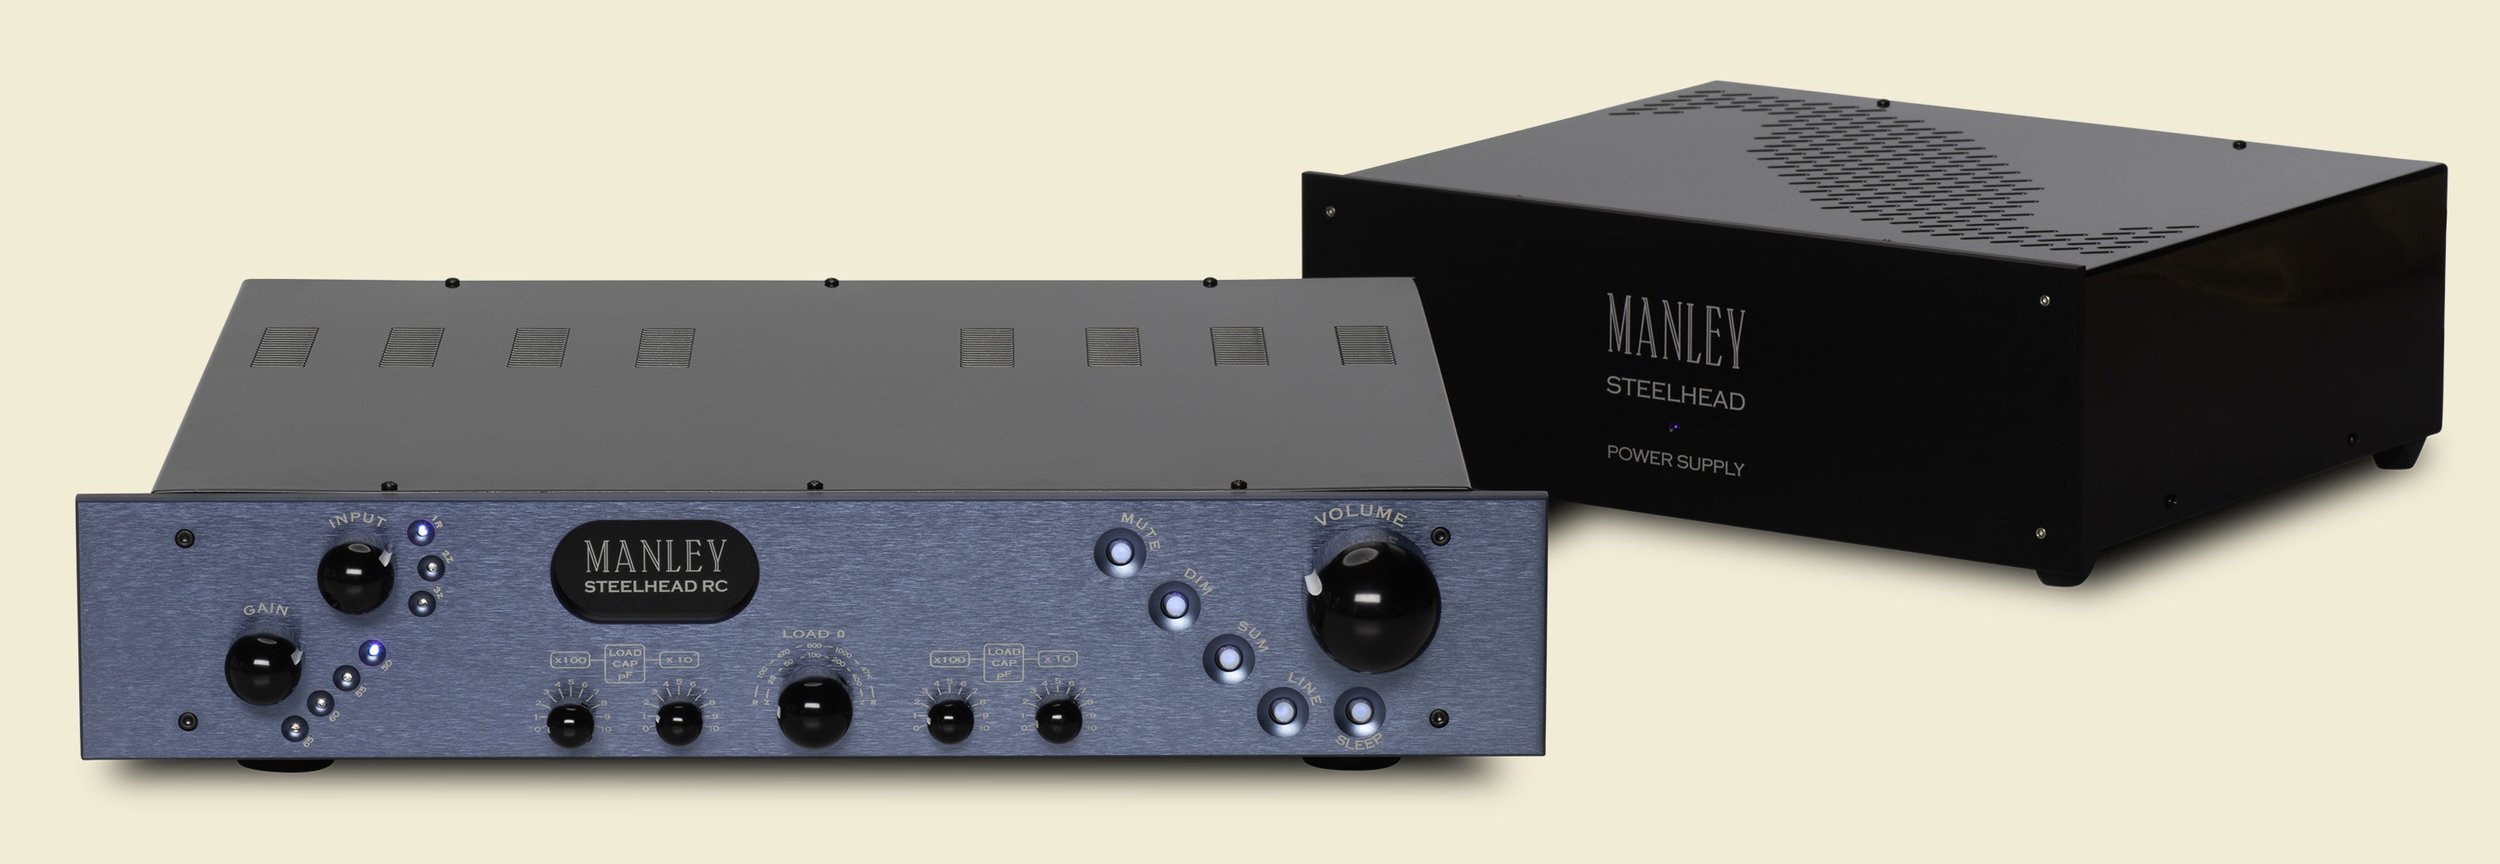

Clean, quiet, and bulletproof with enormous flexibility, the STEELHEAD is both a tweak-o-holic tube-lover’s dream, and a reviewer’s reference.
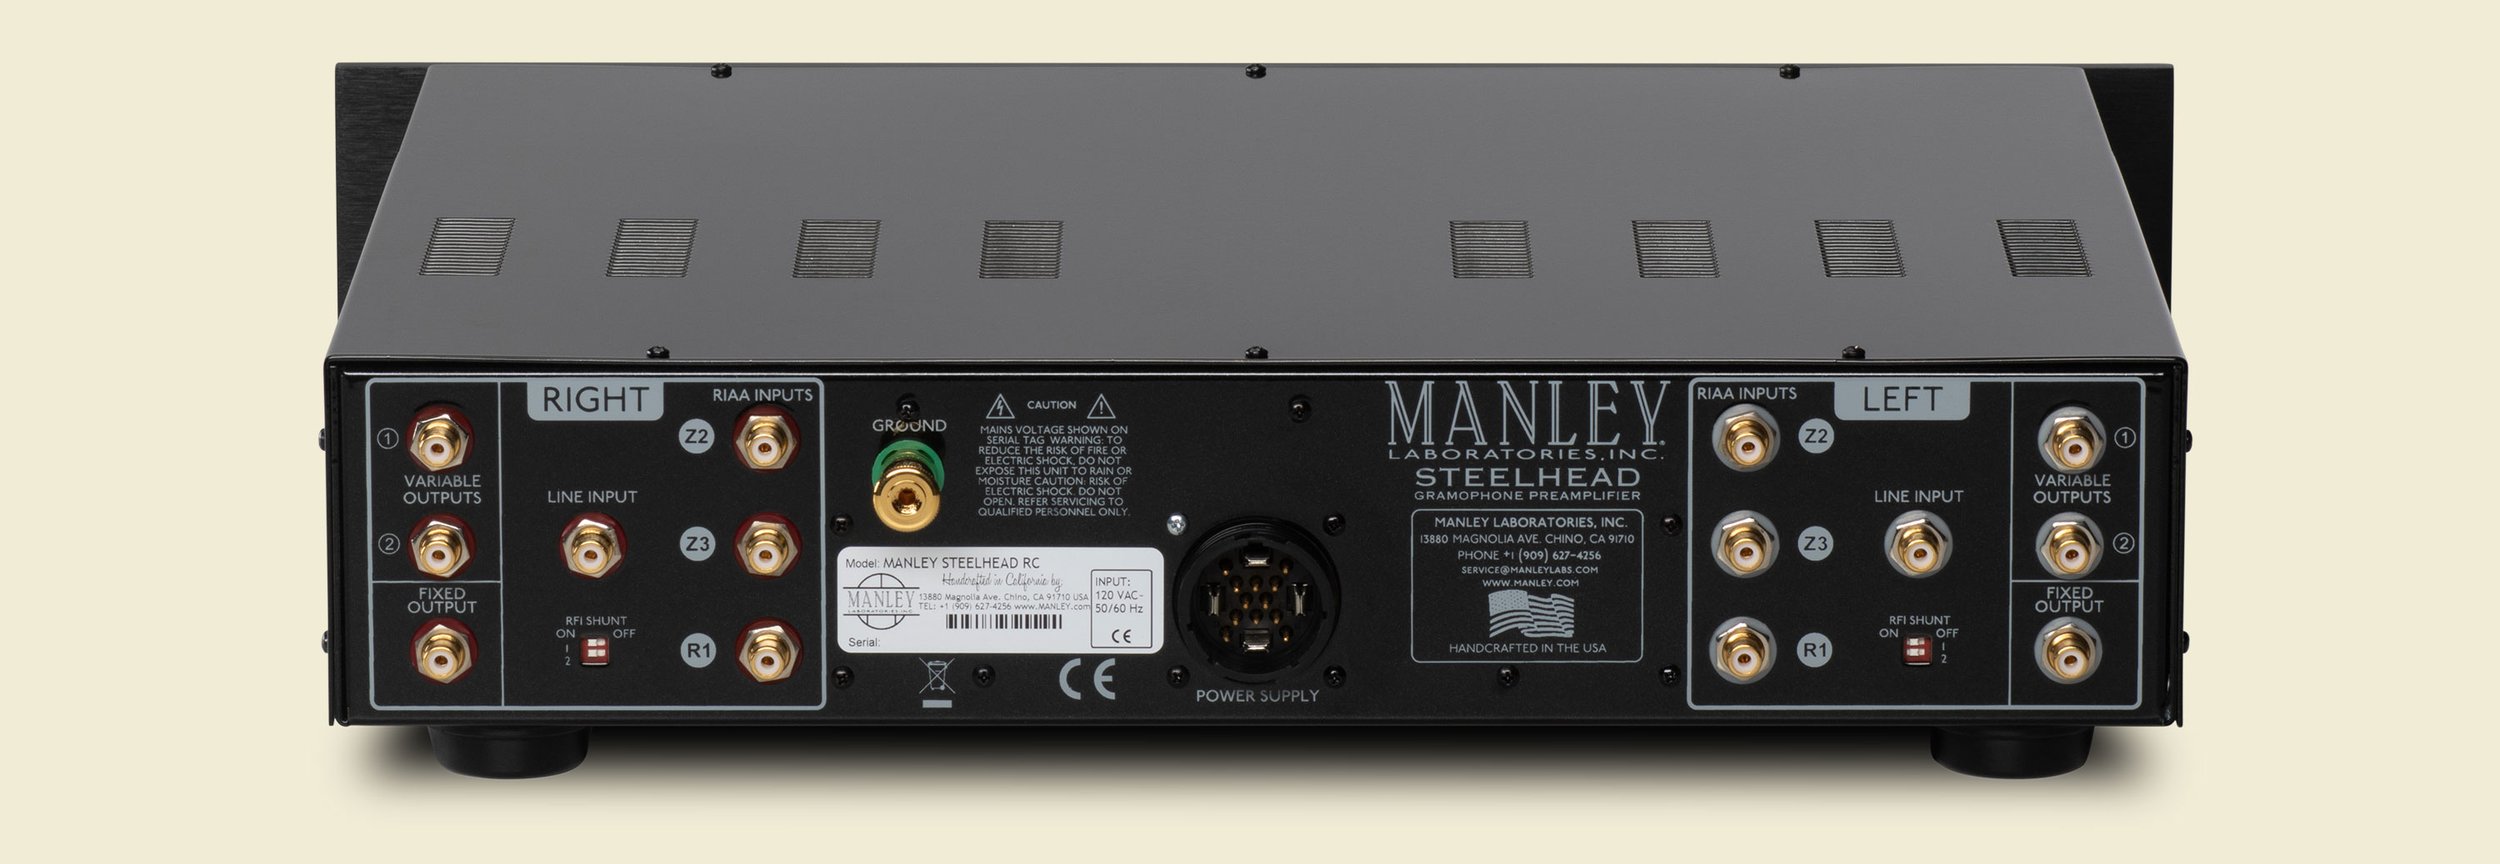
Two of the three inputs have selectable impedance matching via our beautiful Manley-designed and produced autoformers. Resistive load settings for the third “R” input and any capacitive loading from 0 to 1100pF will mate the STEELHEAD perfectly to any cartridge. Audiophile-grade components are used throughout. VARI outs can drive amps direct. LINE input replaces your preamp. Outboard PSU and RF Remora Remote control included.
We debuted to the world a killer frikkin' cool phono stage at CES 2001. It was called, aquatic naming theme continuing, The Steelhead®, as it is an "upstream" device and has a very clever MC variable load auto tranny that we designed and our very own Manley Magnetics department executed (which makes the MC stage so very clever).
Iron = transformer = "steel" makes sense to me...


The Manley STEELHEAD enjoys a Class A+ rating in STEREOPHILE’s Recommended Components
"Overall, the Steelhead delivered the best vinyl playback I've heard from my system."
- Michael Fremer, Stereophile, December 2001 -

DETAILS
It has two inputs that function with the selectable impedance load switch 25, 50, 100, 200 and 400 Ohms via Mr. Clever "Steelhead" transformer/autoformer.
It also has an input that functions with the resistive input loading values of: 100, 470, 800, 1000 and 47000 Ohms. Very nifty is the selectable-dial-able-in-able-from-the-faceplate-able capacitive loading for all three of the phono inputs 0 to 1100 picofarads in 10 picofarad steps. Very cool! Equalize baby! TEN picoFarad steps! Wow! Now you can really dial this in for perfect cartridge matching with ZERO penalty. None of this switching detracts from the sound quality or adds any extra anything to the signal path. Rest assured.
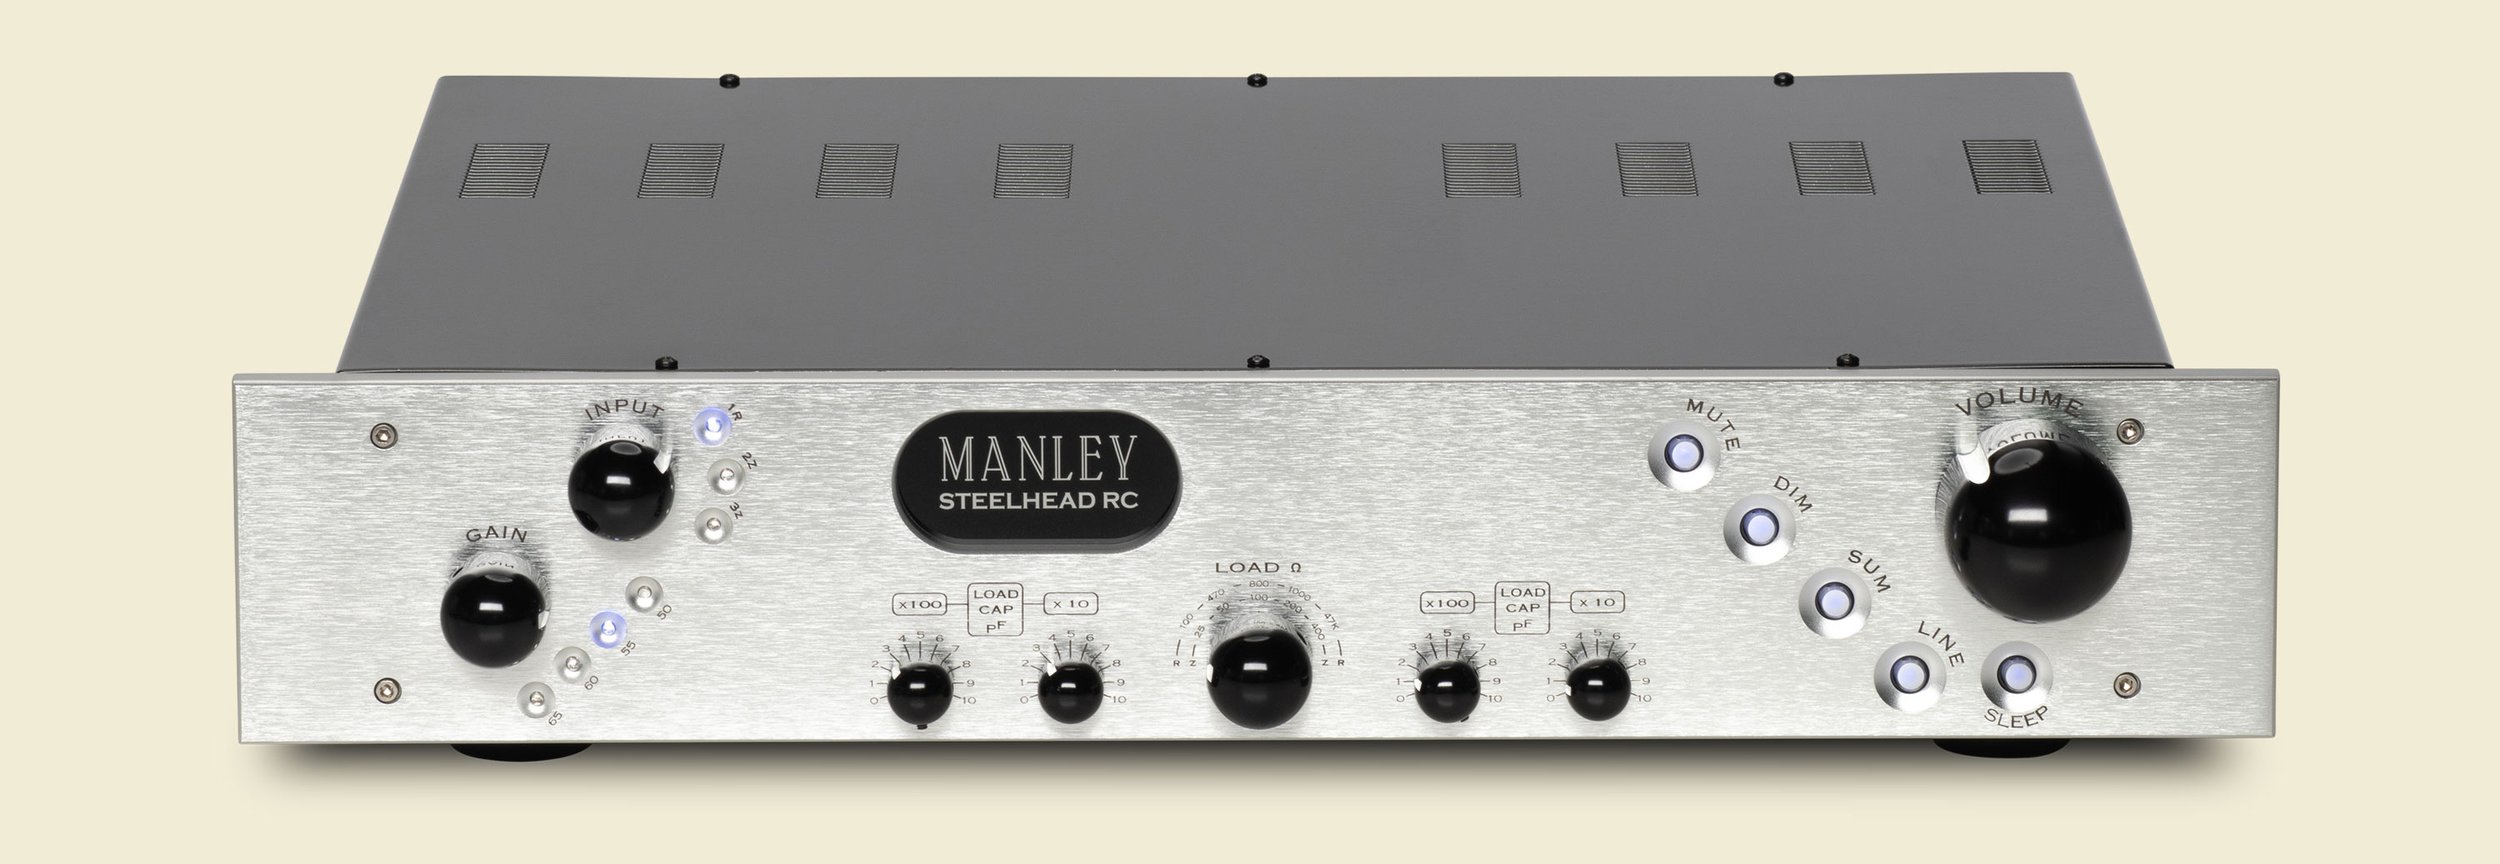
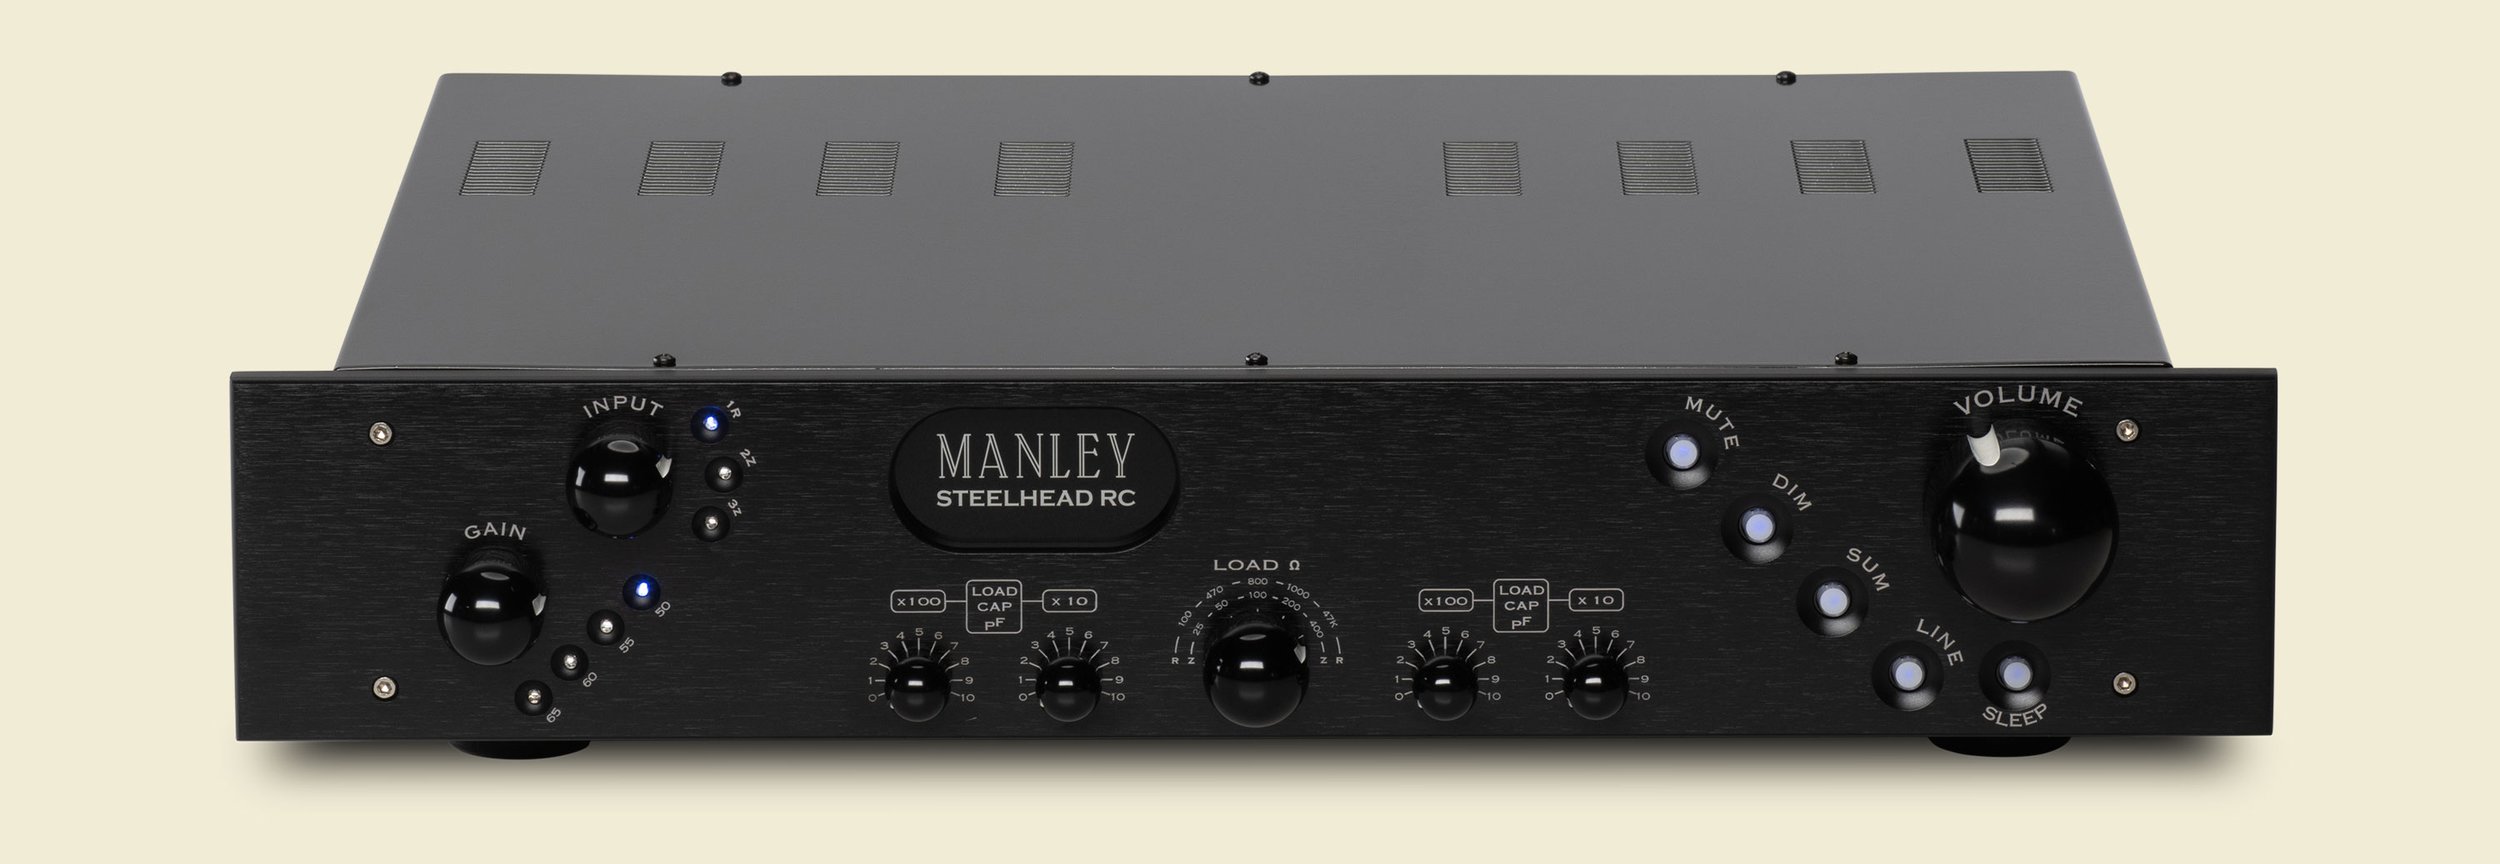
It's got six tubes. 2 x 6922 plus 4 x 7044 or 5687. It's got a big honkin' volume control.
It can drive an amplifier directly if you want, if you don't "do" digital. Hey and if you happen to have three turntables set up, we give you 2 x Impedance loading inputs and 1 x Resistively loaded selectable inputs! It's got variable and fixed volume outputs. And All-tube really low Z tube buffered outputs. Like inherently 20 Ohms plus the little 47 Ohm "OK drive those high capacitance audiophile cables why doncha" resistor, so it's real output impedance is only 67 Ohms. No wanky cathode follower (oh bor-ing) output here like the other guys. We got your real low impedance all-tube outputs right here! It will drive anything and everything. Long cables, no problem.
It's got selectable gain 50, 55, 60, 65dB on a switch that even auto-mutes as you change it.
Gain switch markings are referred to from the input of the 1st active electronics at 1 kHz to the fixed output @ 10k load, regardless of whether source is the first resistively loaded input or the two XFMR stepped-up Impedance loading inputs. It is not really practical to include the step-up gain on the front panel markings due to the variable SOURCE impedances of the cartridges and the variable LOADING that the input XFMR will have on any given cartridge. All of this total gain variability should be confined to about 3 to 12 dB of range though. XFMR step-up gain plateaus as the load Z on a given cartridge is optimized...producing no VOLTAGE gain but in fact a bit more POWER gain... All this means you should set a load Z which sounds best with your particular cartridge and adjust gain to suit your system's operating level. Whatever you like. You will not blow anything up. (Bottom line: there is plenty of gain... enough to do justice to your fave lo-output MC cartridges).

It's got a mute switch. It's got a "just turn it down while I cue up so I don't throw my woofer cones across the room but I still want the same volume I was listening at before I flipped the side" DIM switch.
And what goes with DIM better than SUM which would be the MONO button... It has a killer hyper-regulated outboard power supply that plugs in on the huge-est connector you ever saw. And you can just hit the "standby" button to keep everybody off while you take a small holiday to Tahiti. A backlit "MANLEY STEELHEAD" illuminated badge reflects back to vinyl-days-of-yore while the millions of BLUE LEDs remind you that this is modern tube engineering design, baby! The VARIABLE Outputs are controlled by the precision film dual NOBLE® volume control. They are SMOOTH action these days as the fashion went against the detented ones. This is a tweak-o-holic tube-lover's dream....
Let's talk about the LINE input some more:
There is a stereo LINE input included as standard. This means you can drive your amplifiers directly from the Steelhead's Variable Outputs and select whether you are listening to the Steelhead phono stage or any analog LINE-level source (the analog outputs from your CD player, DAC (Digital to Analog Converter), Tape, Tuner, Television, a whole 'nuther preamplifier's main line output, or better yet, use a Manley SKIPJACK to add up to 4 more LINE inputs into your Steelhead!) This feature turns the hifi world upside down. It is novel.
Other features we should mention:
LINE input comes after RIAA stage, but before the volume control and Variable output white follower buffer. The LINE button on faceplate selects LINE input or the output from the built in RIAA stage.
There are clever anti-RFI grounding options user selectable via dip switches on the back for those in high Radio Frequency Interference zones. If you are picking up a local radio station through your system, try playing with these switches.
All the inputs show up via standard RCA jacks.
There is an additional pair of RCA Outputs for those bi-amping or driving amps and a subwoofer directly from the Variable Outputs. This second set of outputs is wired in parallel to the Variable Outputs. If you need them wired to the Direct Outputs, we can do that too upon request.
The motorized volume control has a smooth action when turned by hand or one can control it via the REMORA REMOTE push buttons.
Badge illumination uses nice looking white LEDs which will never burn out.
Output Muting relays changed to short outputs if power is turned off.
Output Muting relays short out the outputs if power is turned off preventing unwanted bangs or pop noises.
The SLEEP button puts the unit into standby conserving power and tube life.
The audio (audible) circuitry has remained largely unchanged since the first Steelhead shipped in 2001.
SPECIFICATIONS
Vacuum tube complement: 6922 SOVTEK Russian x 2 (gain) plus JAN NOS GE 7044 or 5687 x 4 (output buffers)
Fuse type and ratings @ 117 VAC operation: 1.5 Amp 3AG slow-blow mains fuse 0.5 Amp 3AG slow-blow logic fuse
Fuse type and ratings @ 230 VAC operation: 0.75 Amp 3AG slow-blow mains fuse 0.25 Amp 3AG slow-blow logic fuse
Resistively Loaded selections: 5-step user adjustable via fixed low-noise resistors. 100, 470, 800, 1000 and 47000 Ohms. (after mid-2020)
Impedance Loaded input selections: 5-step user adjustable via multi-tap autoformer: 25, 50, 100, 200 and 400 Ohms.
Input Termination Capacitance: Front Panel Selectable in 10 picofarad steps from 10 to 1100 pF (1.1nF) Residual input capacitance less than 40 pF.
GAIN: 4-step user adjustable, 50, 55, 60 and 65 dB active gain at 1 kHz referred to the FIXED output jack into a 10 kOhm load. Additional gain available via the two autoformer inputs’ step-up autoformer. See Owner's Manual for discussion.
Deviation from RIAA curve: Less than +0.5 / -0.3 dB from 20 Hz to 20 kHz at any gain setting. Typically less than ±1 dB from 10 Hz to 100 kHz
Inter-channel differential phase: Less than 4 degrees from 20 Hz to 20 kHz at any gain setting. Typically less than 2 degrees.
Inter-channel differential gain: Less than ±0.5 dB from 20 Hz to 20 kHz at any gain setting.
Dynamic Range: 101 dB @ 1 kHz, 1% THD measured with 200 Ohm source, 47 kOhm input, @ 55dB Gain 97 dB @ 1 kHz, 0.1% THD
THD: 0.0042% at 1V output @1kHz
DIM function level reduction: 24dB with volume at MAX CW, 20dB with volume at 50% rotation.
REMORA RF REMOTE: controls motorised volume control up/down functions; uses 9v battery
Maximum MM input level: 50 mVrms @ 1KHz for an output of 17 Vrms or -23.8 dBu @ 1KHz for an output of +27 dBu @ 1.5% THD
Maximum MM input level: 93 mVrms @ 1KHz for an output of 29 Vrms or -18.4 dBu @ 1KHz for an output of +32.3 dBu @ 10% THD
Maximum MC input level: 39 mVrms @ 1KHz for an output of 17 Vrms or -26 dBu @ 1KHz for an output of +27 dBu @ 1.5% THD
Maximum MC input level: 72 mVrms @ 1KHz for an output of 29 Vrms or -20.6 dBu @ 1KHz for an output of +32.3 dBu @ 10% THD
Maximum LINE input level: 26.5Vrms @ 1KHz for an output of 22.8Vrms or +30.6dBu @ 1KHz for an output of +29.3dBu @ 0.07% THD
Maximum Output: +27dBm @ 1KHz with 3% THD into 100 kOhm load
FIXed Output impedance: 150 Ohms. Minimum suggested load greater than 1500 Ohms.
VARIable Output impedance: 75 Ohms. Minimum suggested load greater than 600 Ohms.
| Variable Output | |||||
| GAIN Setting | Fixed Output | 9:00 | 12:00 | V/C FULL | |
| MM Noise (S+N+D) / (N+D): | 50 dB | 86dB | 108dB | 99dB | 86dB |
| 200 Ohm source, 47 kOhm input A-weighted Referred to 2.54 mV rms @ 1 kHz |
55 dB | 84dB | 108dB | 99dB | 85dB |
| 60 dB | 80dB | 108dB | 94dB | 80dB | |
| 65 dB | 75dB | 108dB | 89dB | 75dB | |
| MC Noise (S+N+D) / (N+D): | 50 dB | 84dB | 108dB | 98dB | 85dB |
| 100 Ohm source, 100 Ohm input A-weighted Referred to 0.5 mV rms @ 1 kHz and rated Input Z |
55 dB | 80dB | 108dB | 95dB | 81dB |
| 60 dB | 75dB | 108dB | 90dB | 76dB | |
| 65 dB | 70dB | 107dB | 85dB | 71dB | |
Power consumption: 100 watts
Outboard Power Supply: is factory set for 100V, 120V or 220-240VAC operation for original destination country's mains voltage.
Operating Mains Voltage: 120 to 240VAC operation changeable with power transformer re-wiring via internal switch and fuse value change. 100VAC operation changeover achieved via rewiring of power transformer PCB.
Mains Voltage Frequency: 50~ 60Hz
PSU Regulation good for 65% rated voltage: 75VAC for 117V unit or 150VAC for 234V wired unit.
Unit weight: Steelhead: 15 lbs. - PSU: 18 lbs.
Chassis dimensions: Steelhead: 19 wide x 3.5 tall x 15.5 deep - PSU: 13.5 wide x 4.5 tall x 11.375 deep
PSU umbilical cord length: 5 1/2 feet approx. 1.65m
Minimum mounting allocation footprint including all projecting parts and controls:
Steelhead: 19 wide x 4.125 tall x 18 deep - (allow an additional 6 inches depth for PSU umbilical cord projecting out in the center)
PSU: 13.5 wide x 4.625 tall x 12.5 deep - (allow an additional 6 inches depth for PSU umbilical cord projecting out in the left)
Your phono input cables need to be able to spread 9" apart.
Your LINE input RCA cables need to be able to spread 12.250" apart.
Your Output cables need to be able to spread 15" apart.
The chassis itself is 17" wide. The faceplate is 19" wide.
Specifications subject to change because they just might.
REVIEWS
“…despite the passage of time, and even in the absence of constant marketing and ‘exposure,’ some components deserve to be known as benchmarks for what is possible at a certain price, and as the best of their kind…It's difficult for me to imagine ever being able to afford the Steelhead, but it also happens to be the most thrilling phono amplification device I've heard, and not by a small margin. Sometimes it turns out that spending a lot gets a lot more enjoyment.”
- Alex Halberstadt, Stereophile, December 2022
"Overall, the Steelhead delivered the best vinyl playback I've heard from my system. It combined speed, frequency extension, resolution, harmonic structure, focus, air, stage depth, image specificity, and, most important, overall musical coherence in a way that made the music seem to fly from the speakers unrestrained by mechanical or electrical bounds."
- Michael Fremer, Stereophile, December 2001
"...the Steelhead is a very fine phonostage. And no, you’re not just paying for flexibility — the damn thing sounds great and very easily competes with a purist-design...and well, the Steelhead is so pretty. I guess you could say I’m a fan of the aesthetic. Very MANLEY."
- Scot Hull, Part-Time Audiophile, January 2011
"The Manley Steelhead is a tube phono pre-amp with all the qualities we love about tubes and none of the limitations of those thermionic devices...I lay odds that whatever kind of audiophile you consider yourself to be, you'll find yourself more involved in the music."
- Marshall Nack, Stereo Times, December 2002
"Whatever cartridge I fed it, the Steelhead would allow me to tweak it to degrees rarely achieved even with other well-specified, highly-flexible phono stages; whoever chose the assorted settings chose wisely...I'm prepared to say that the Steelhead is the best-sounding phono stage I've ever experienced."
DOWNLOADS

FREQUENTLY ASKED QUESTIONS
FAQ #1: The Steelhead is unbalanced. Why can't I have balanced outputs?
Yes the Steelhead is entirely a single-ended design. The circuitry uses single-ended topology. In order to be able to provide balanced outputs we would have to convert the signal to balanced using something like some IC's or transformers. Both these options would add more "stuff" to the signal and be certainly audible detracting from the pure sound the Steelhead provides. If you are driving a balanced preamp or balanced amplifier with the Steelhead, check to see if you also have unbalanced inputs, change your cables and go with that. You might be pleasantly surprised that they too added extra audible "stuff" in order to provide balanced inputs and the RCAs that don't have that extra "stuff" in the signal path actually sound better. (Depends on a given unit's specific design.) Or use some RCA to XLR adaptors. Most balanced gear has no problem being driven single ended but check with the manufacturer if they are going to want the negative pin 3 of the XLR grounded or floating. Transformer-coupled XLR jacks always can be driven single-ended by running HOT into Pin 2 and grounding pin 3 to pin 1. Some IC coupled XLR inputs will want pin 3 floating, others will require it to be grounded when running single-ended into it. Check with the manufacturer of your gear to see how to hook it up single-ended.
FAQ #2: The MM circuitry by-passes the auto-transformers?
Yes it does. MM comes in AFTER the autoformers.
FAQ #3: Why are there three ground connectors? Does the user have to connect the bridged one or not?
There are two ground points available (circuit ground and chassis ground) and there is a 3rd big gold chassis ground connector there for flexibility. In my system I do leave the chassis ground hooked up to the circuit ground (I do keep the link hooked up between the little green and black binding posts). And that link should normally be left connected. But sometimes, in some systems, for troubleshooting system humming it is handy to be able to isolate different ground points and play around with things.
The BIG gold binding post is another CHASSIS ground. It certainly is convenient having another free chassis ground access for grounding my tonearm, motor housing, and spindle, for example.
Experiment and play around. There is no right or wrong to how lowest noise levels get achieved except whatever configuration gets the hum and buzzes level in your system down the most is what is right.
I have a TNT HR-X at home and had to run a ground from the TT spindle to a screw on the top of the motor housing to quiet a buzz. The other ground goes from the TT arm-ground to The Steelhead's big gold ground post. In addition I also had to run a ground link from my WAVE preamp to the Steelhead.
I found the best grounding path for my whole system by experimenting first with the mains 3-prong grounds using cheater plugs to kill off system hum, then I used clip leads (or bare wire) to touch between different elements in my system to find out who wanted to be grounded to whom and kill out the buzzes.
Every system is different. Every room is different. Every piece of gear in your system can influence system noise levels, so always explore grounding options whenever you add anything into your system, yes, even changing cables...
Keep playing with those grounds, especially the 3rd pin mains grounds (earth). Usually your system will only want ONE piece of gear grounded into the wall or else you'll have ground loops.
Simplify the system to test. Unplug everything and try just one TT/arm, Steelhead, to amps. Check your hum level. Then add more gear in, listen to hum each time. Experiment with additional ground wires between chassis and CD player. Only make one change at a time and you will find the quietest solution for your system.
FAQ #3a: The Steelhead is humming! I am going to measure the ripple on the PSU caps.
Hi John,
I doubt it is a PSU ripple issue but you are welcome to look at things and here are the schematics to assist you.
Again, every time I run into these things it is usually a system problem. I can't tell you how many times after I have changed something, I have dragged in gear from my house to the factory only to be shown it works perfectly and I have a system grounding or radiation issue. I have learned.... and I have seen many things in my nearly 20 years dealing with THIS tube gear.
This is exactly what I would do and what I do when I am going through a system:
When looking for these things you have to start with the simplest system you can create. When I am looking for system ground hum, first I unplug everything. All mains cables from walls, ALL interconnect ICs from all gear. Note that gear that is "turned off" might just be sleeping. UNPLUG the AC mains from the wall to assure that it is really out of the system.
Start from fresh. Start from scratch. Do not presume that a Steelhead will behave the same way your last phono stage did with regards to induction and ground currents.
Clear the head and work methodically.
Plug in one amplifier and one speaker. No input (or shorted input). Assure it is hum-free. Just that.
Check the other amp and speaker in isolation. Quiet? Good.
Add ONLY the ICs to the Steelhead. Do not turn on the Steelhead. Do not plug the PSU into the wall yet. Do not have any inputs or TT grounds connected. Just the chassis of the Steelhead connected to ICs to amps. Listen to each amp. Still Quiet? Good. Now plug the Steelhead PSU into the wall. Listen for hum. Any change? Look at mains grounds situation. Try one amp grounded and everyone else floating. The other amp. Just the Steelhead grounded. Float everyone. Try it all.
Turn on Mr. Steelhead. Any change? Line input hums? Variable outs? Fixed outs? MC in? MC2 in? MM in? Hums changes with Gain changes? Hums differently with open input vs. dummy loaded input or shorted input? Step by step try each and every thing and listen. Now add ONE cartridge input and a TT ground. Listen to the effect of the ground. Listen to one channel only? Still humming? Maybe not? Add the other cartridge input IC to Steelhead. Try another set of ICs? Get a bare wire and touch Steelhead chassis to different points on TT. Pick up the Steelhead unit and physically move it around. Any change?
Lastly, sub another Steelhead PSU. Then head unit?
Two Steelheads will not both be defectively humming. There is little chance of that....
Please try these things. Step by step and be methodical... let me know.
Hi EveAnna and Mike,
My profound thanks to you both for the outstanding support and interest that you have shown in the problem I encountered with hum in my audio system. In the end the culprit turned out to be the mains filter that I was using, although quite why I am not sure - possibly it degraded the supply waveform and got into the low noise stages that way. Be that as it may, removing it and plugging straight into my mains supply cleared the hum totally.
For the record, I never thought that the Steelhead would produce any hum at all, I merely thought that my particular unit had developed a problem, such as a faulty voltage regulator or some such.
The mains filter in question is one that was given to me by a friend who was improving his system. It is of unspecified manufacture, and now resides in my scrap bin.
Unfortunately it has wasted a lot of time for each of us, and for this I must apologise. The exercise has however assured me that I could not have bought a better product, that was better supported anywhere in the world, and I congratulate you on your fine achievements.
With best wishes and, grateful thanks
John Bonnard.
FAQ #4: Why did you decide to have a DIN input for the second MC on the older Steelhead's? Are there any other differences between the two MC inputs? I see they are both RCA jacks on the Version 2 Steelheads.
There are no differences between the DIN and the RCA MC's except I love to see the negative side of a cartridge lead NOT carried along the shield of an RCA! The DIN connector offered a tasty way to avoid that, but since NOBODY took advantage of that feature, in the Version 2 units we scrapped the DIN and just provides a second set of MC RCA's since that's what everybody wanted.
FAQ#4a: How do I make a cable for that DIN connector? What is it?
The chassis part is: Neutrik Rean NYS325 5 Pin DIN Female Chassis Connector
You can find mating 5-pin connectors here (for instance)
This is a common standard part "5 Pin DIN" so there are other suppliers of cable plugs available from other vendors.
FAQ#5: What are those two little boards between the tubes board and the front panel?
They hold the RIAA EQ circuitry which is calibrated and adjusted for nearly perfect matching.
FAQ#6: I heard from a dealer that the Steelhead's loading switching adds all kinds of crap to the circuit and I should buy this other preamp that doesn't have all the switching. Is that true?
That is total BULLSHIT and stupid rumour mongering put out there by the dealer trying to sell you the other thing he has in stock instead. The switching is all done on sealed gold contact Grayhill switches, located right where the switching is being done. We use those long shafts from the faceplate back to where the loading is done so the signal isn't traveling for long distances on the PCB. It is passive switching of taps on the autoformer for the MC loading, resistors for the MM impedance loading, and capacitors for the capacitive loading. The inherent total input capacitance in the Steelhead, including its internal wiring is less than a paltry 40 picofarads, much less than your interconnects probably are, not that most wire manufacturers could actually tell you what the capacitance per foot of their wire actually is.
We chose the internal hookup wire that we use inside the Steelhead after receiving many samples of quite a few high end cables and measuring them. We chose the one with the least capacitance per foot that we could find, 8pF per foot if memory serves me right. That is LOW. You wouldn't believe how high some audiophile cables go. No wonder they sound "euphoric"...
Read the Owner's Manual where this topic is discussed in greater detail. And just listen to these preamps yourself to make the right decision over believing everything or anything some salesman might tell you. Uhm, and especially when the salesman is not even a Manley dealer! Duh!
FAQ #7 Why did you decide to have the "sum" switch active only on the variable output? I feel it works MUCH better than a normal "mono" switch on a preamp...
There is a good answer for this: the signal between the RIAA and the first white follower FIXED output is direct coupled and does NOT have a DC blocking capacitor in the way. There is many volts of DC there and so you cannot do the mono of the audio there. The DC gets blocked off by the MutiCaps to go into the volume control and then into the second white follower for the Variable output. It is at the DC-free point near the volume control that we can and do perform the SUM function.
FAQ #8 What's the deal with the new LINE input? Do I also need another preamp?
On the Version 2 Steelheads, which is what ships now, there is a LINE input. So yes, you can run 2 channels of SACD, CD, TUNER, TAPE, audio output from your TV, or whatever line source into it. That's 2 channels meaning one source LEFT and RIGHT.
You can even run another preamplifier's outputs into it. So when you hit that LINE button, you are selecting either the phono stage output in the Steelhead (same as FIXED OUT) or whatever is plugged into the LINE input. From there it goes to volume control and then a high current low impedance vacuum tube White Follower output, the VARIABLE OUTS. That Steelhead driving amps direct is the total killer setup.
The VARIABLE OUTPUT is the common thing here. The Variable Output consists of the Noble volume control and great sounding tube White Follower high current low impedance output stage. I think this output stage sounds awesome. It's my fave. We use this same stage in a lot of our products. No whimpy plain-jane high output impedance cathode follower. This is a White Follower we're talking about!
The LINE button is selecting whether you are listening to the phono section of the Steelhead or your LINE input to drive the volume control and White Follower Variable output. I don't let anything get in between this Variable Output and my amplifiers. (Except the cables...)
You would only need another line preamp if you *need* more gain. With most digital DAC/CD/SACD players' outputs being 2V and up, and with all the gain available in the Steelhead, unless you have very insensitive amplifiers driving very insensitive speakers, you have more than enough gain already to drive most amplifiers to full power, so the last thing you need is more gain. What you really need is attenuation, which is what a volume control is. See? It's a novel concept that I am surprised no one else has copped onto yet.
Soooooooooooooo....... if you don't need more gain, and you just need more LINE inputs, get a Manley SKIPJACK to add more LINE inputs into your Steelhead!
FAQ#8a Can you please expand upon this LINE input subject and the GAIN issue? My [other] preamp is "louder" that this cool Steelhead setup you described above.
OK. You asked for it:
Discussion of the LINE input and LEVELS in general:
Note: If your XLR's out of your CD/DVD/SACD player are balanced, they could be 6dB more level than the unbalanced RCA outputs. This is the nature of balanced vs. unbalanced. This would "sound just a little less than twice as loud". Right there.
Then of course your line preamplifier you are feeding from your CD/DVD/SACD XLR's has "X" amount of gain. "Unity Gain" on that piece could be anywhere on the volume control, depending on the design of that piece.
The Steelhead's UNbalanced LINE input goes into the Volume Control and then it goes through the White Follower Output Buffer and then it goes out by the RCA UNbalanced Variable Outputs. The White Follower has about -0.9 dB (-5%) of gain. Thus with volume full up/open there will be a -0.9 dB reduction in gain of the signal. 0dB of Gain would be "Unity Gain". -0.9 dB reduction is very very close to Unity Gain, in fact most people would not be able to hear a -0.9 dB of gain difference, so for all intents and purposes, just call "Unity Gain" for the LINE input on the Steelhead to be with the volume control fully open all the way. The Steelhead will not ever amplify the voltage of the LINE signal feeding it. The Volume control will only attenuate the signal as you turn it down from full up.
So of course the 6dB louder balanced XLR send feeding your "gain-y" other line preamp will "be louder" in comparison to the Steelhead.
There are several factors about whether you have enough gain in your whole system to be able to use the outputs from the Steelhead directly into your amps:
Output level of cartridge? (affects phono only)
Gain setting on Steelhead 50, 55, 60, or 65dB? (affects phono only)
MC or MM and what loading with what cartridge?
Output level of CD/DVD/SACD player?
Balanced or UNbalanced?
Where do you have the Steelhead volume control?
Input sensitivity of amplifiers?
Efficiency of loudspeakers?
Room size?
Expected listening volume?
Various levels recorded to the record/CD/DVD/SACD you are listening to?
Various amounts of limiting and/or compression applied during mastering to the record/CD/DVD/SACD you are listening to?
There are also some other factors, but we'll just stick with these ones for now.
If the following is going on:
LOW Output level of cartridge for example 0.2mV (affects phono only)
50dB Gain setting on Steelhead (affects phono only)
Resistive Overloading cartridge going into MM input (throwing away volts right there by mis-match). (affects phono only)
LOW Output level of CD/DVD/SACD player for example 2V DFS
UNBALANCED (by nature of the Steelhead)
10 o' clock on the Steelhead volume control (because you have a fear of going past 11).
LOW Input sensitivity of amplifiers for example 3V
LOW Efficiency of loudspeakers for example 84dB
BIG Room size for example 25 x 30 x 14
POUNDING Expected listening volume for example 120dB
LOW levels recorded to the record/CD/DVD/SACD you are listening to
NOT A LOT of limiting and/or compression applied during mastering to the record/CD/DVD/SACD you are listening to.
Then it might be possible you need more gain in the system, like a line preamp following the Steelhead with 15 to 20 dB of gain. Or you might just get by with the Steelhead running his volume control at 3 to 5 o'clock and not worry about blowing anything up because you read that FAQ#6414. That is, if the final listening level is loud enough for you. All this can be calculated, but I'm not going to do bunches of math for you right now.
If the following is going on:
DECENT Output level of cartridge for example 0.7mV (affects phono only)
65dB Gain setting on Steelhead (affects phono only)
Resistive Overloading cartridge going into MM input (throwing away volts right there by mis-match). (affects phono only)
UNBALANCED (by nature of the Steelhead)
3 o' clock on the Steelhead volume control (because you have no more fear about where the volume control sits because now you have read FAQ#6414).
HIGH Output level of CD/DVD/SACD player for example 6V DFS
HIGH Input sensitivity of amplifiers for example 0.775V
HIGH Efficiency of loudspeakers for example 100dB >br?TINY Room size for example 10 x 12
LOW Expected listening volume for example 85dB
HOT levels recorded to the record/CD/DVD/SACD
A TON of limiting and/or compression applied during mastering to the record/CD/DVD/SACD
Then, without running all the calculations, I would bet your volume control would be barely cracked open, like at 9 o'clock, under that scenario, and your ears would be bleeding.
So now that I have explained all this to you, it will be up to you to understand your system gain properties and see if you will have enough gain to not have to use your LINE preamp between the Steelhead and the amps.
Another option of course, if you only need more gain for your CD/DVD/SACD player but you are OK with the phono levels when you are running the Steelhead straight into your amps, is you can run your SACD player into your "other" line preamplifier, and then run the output of that into the Steelhead's LINE input. Try it.
Again, you will not blow anything up. Please feel free to try different things and see what works for you. And remember, if you change any one of those 12 factors I outlined for you, then everything changes....
Version 1 was the first version. It has FOUR pushbuttons on the front: MUTE, DIM, SUM, STANDBY.
Version 1.5 has the LINE input mod. This was done by stealing the DIM relays and reallocating them to select LINE or RIAA. It has FOUR pushbuttons on the front: MUTE, LINE, SUM, STANDBY.
Version 2 has the LINE input built in as standard with DIM function retained. It has FIVE pushbuttons on the front: MUTE, LINE, DIM, SUM, SLEEP.
FAQ #9a Can I update my Version 1 or 1.5 to Version 2?
We can modify your Version 1 Steelhead to Version 1.5. We cannot mod your Version 1 or 1.5 Steelhead to Version 2. Different boards, different chassis to accommodate the new switches and stuff. If you need this update, please click here to contact us about it.

Above: Version 1.5 Steelhead (4 buttons with line input instead of DIM)

Above: Version 1 Steelhead (4 buttons with DIM button but no line input)
24K Gold Plated Version no longer available by special order. So don't ask. Ain't gonna happen! We are done with the gold thing.
FAQ#10 How do I hook up the Steelhead?
Start with this simple drawing. I drew it out especially for a rock star. Click to enlarge.
FAQ#10a I need more LINE inputs. How do I do that?
FAQ#10b Can I use a Manley SKIPJACK to work as a TAPE LOOP so I can record my vinyls and CDs?
Yes you can. Check out the drawing on the Manley SKIPJACK page!
FAQ #11: What about the two sets of Variable Output RCAs? Are they the same thing?
There are no differences between the two Variable Output RCA jacks. They are both hooked up to the same point. Having two sets of jacks lets you bi-amp or drive two systems without having to use those cheapo "Y" adaptors.
FAQ#11a You ship the Version 2 Steelheads wired with 2 x Variable Outputs and 1 x Fixed outs. I need to have 2 x Fixed outs. How do I do this?
There are 3 sets of stereo outputs on the Steelheads. 1 x FIXED outs which come after the first white follower output buffer but before the volume control. Then there are 2 sets of variable outs which are the same thing; coming off the volume control and second white follower buffer.
So the signal flow goes:
phono stage-->Fixed output-->volume control-->Vari Out x2
| |
mute Line In-DIM-SUM
I recommend to use the 2 sets of Variable outputs to drive your two systems. If you are driving additional preamps, just set the Steelhead's V/C up pretty high or even all the way up. Yes, you are going through the V/C and an additional White Follower, so you would have to see if you can "hear" this or not really...
You *can* rewire one of the Variable Outs to be another Fixed out if you wish. If you open up your Steelhead, you can easily see the jumper arrangement on the back boards, right behind those output jacks. You would need to remove the clear signal jumper and the buss wire ground wire going from the Variable out on top to the middle jack and instead bring up those two connections from the lower Fixed jack to the middle jack instead to reallocate what the middle jack is getting fed with, the Fixed or the Variable Out. If you can solder, or have a friend who does, you can do this. It is a very simple 5 minute job.
FAQ#12 The FIXED OUTPUTS are not working. I can't hear my CD player that I have plugged into the LINE input through them. Are the FIXED OUTPUTS broken?
The FIXED OUTPUTS only play the Steelhead's phono stage. The LINE INPUTS only work with the VARIABLE OUTPUTS.
FAQ#13 Can I use those 6N1P russian "super" tubes instead of the 6922?
No. There is not enough amperage available in the heater regulator for those tubes and we can't use the 2A regulator cuz the protection circuitry in it latches up. Also, it may change the operating point and require a re-cal. Stick with 7308, E88CC, 6922 or 6DJ8 types please. That's what we designed the unit around.
FAQ#13a Can I replace the 6922's in the Steelhead for NOS Mullard ECC189/6ES8?
No.You can use 7308, E88CC, 6922 or 6DJ8 types. Or just trust us that we selected super quiet 6922's for you when we shipped the unit.
FAQ#13b Can I replace the 6922's in the Steelhead for NOS Mullard E288CC?
I'd advise against a field swap-out using the E288CC. Better to use 7308 or the other types mentioned below.
There are some electrical conflicts which can produce problems if a swap is done in the field:
E288CC heater current is rated at 475 mA, which may overrun the heater power supply channel(s) especially when the system is turned on from stone cold or the power supply is operating off of a 50 Hz power line. Note that the 6922 - 7308 - 6DJ8 - ECC88 - E88CC filament current is rated at 300 - 365 mA. The higher the heater current draw becomes, the more important the line voltage be at the target voltage of 117 - 120 VAC. Too high and the voltage regulator may overheat and fall back into self-protection. Too low and the deeper ripple-voltage troughs at the filter cap may drop below regulator's minimum required input causing hum to leak through the regulator and appear in the audio output.
E288CC's mu is 25 versus 33 for all other types. This may "detune" the RIAA network response slightly due to change in effective plate resistance and force re-alignment of the gain trims so the system gain matches the designations on the front panel's GAIN rotary switch. The E288CC MAY be able to be set up for satisfactory use if fitted at the factory and then aligned. By satisfactory, I mean that the finished system meets or exceeds tight specifications after gain and eq alignment.
In short, the E288CC is more trouble then it's worth and the only one of the six types in the group where a few key specs depart notably from the rest of the bunch. The lower mu is not too important in radio front-end applications (compensated by higher Gm and lower plate resistance); it is more important for this audio application. Happily, mu does not change much if at all over a wide range of operating conditions, nor over the life of the tube.
FAQ#13c Can I replace the 6922's in the Steelhead for ECC88 or PCC88?
Sure you can and here is a report from a customer:
“i've been swapping the ecc88 and pcc88 for the last months, and here are my findings:
pcc88 seems to work just fine in the steelhead, i've not had any trouble so far. the sound seems more relaxed and a little bit warmer with pcc88 and than ecc88. the soundstage is bigger. at the same time, the ecc88 has more grip and better/more focus on details in the upper frequencies.
“what is best is of course depending on the rest of the system (poweramp, speakers, turntables, pu, etc), but the pcc88 is a really nice alternative for steelhead owners who wants to tuberoll in seek of characteristics that suits their system.
“i'm using nos siemens halske pcc88 right now, and i like it alot.”
FAQ #13d: What's the difference between a 5687 and 7044?
The 7044 is used in the White Follower output stage, and honestly there's really no difference between the NOS GE 7044 and NOS 5687 in this specific circuit. The gain is less than 1, (0.9 actually) and rolling tubes here has minimal effect on the sound, if any.
FAQ #13e: Can I use an E182CC instead of the 7044?
Yes, for this circuit, the E182CC or 7119 or 5687 or 7044 will all work fine.

FAQ #33 1/3: Would you trust a guy who looked like this to align your turntable?
You bet I would!
Go order Michael Fremer's Practical Guide to Turntable Set-up DVD!
You get over three hours of Mikey teaching you how to set up your vinyl rig and so much more (hair). Nobody who owns a turntable should be without this DVD. Mikey makes it all easy and fun!
FAQ #14: Hey! I get a loud POP or BANG noise through my audio system! It is random. What's wrong with my phono stage making this noise?
A: It's not the phono stage making any noises. We have seen this over and over when static on the acrylic turntable platter builds up and has nowhere to go except through the cartridge and through the Steelhead into the rest of your hifi system eventually getting amplified by everything until you hear it through your speakers. This is not a problem with the Steelhead. It is just amplifying what is being sent to it. It is just doing its job.
You have got to get a ground to the platter somehow so that your Van de Graaf generator has a place to discharge to besides through your audio system. See if you can get a ground wire to the center spindle housing, maybe under the spindle bearing of your turntable. Contact your turntable manufacturer asking them how to get the static that builds up on the platter to dissipate through a ground wire instead of through your cartridge/audio path!
Another idea is to purchase this AcousTech Big Record Brush with Grounding Cord, ground the brush with the ground wire, and run it over your record and turntable to remove static before you play each record, especially in dry climates and low humidity winters.
FAQ #15: Is there any way to get more than 400 Ohms out of the MC out on the Steelhead? I have a cart that wants 470 or more and MM can do 47kOhms, but I don't have any knowledge of the loading caps it would take to bring that down to something usable (probably takes 1kOhm resistors but I don't know how to make these). Any ideas?
A: If you require a different input impedance than 400 ohms, use the MM input (47 kOhms) and use a parallel loading resistor. The total resistance of this circuit will be somewhat lower than the resistor you choose as it will be in parallel with the 47 kOhms internal resistance. If you want an exact value, there is a parallel resistor value calculator here. You can use an external load, like one across hot to ground inside an RCA F-to-M barrel adaptor or if you can solder, add your parallel resistor across the 47 kOhm resistor on each channel’s MM input jack. There will be no voltage step-up with the MC’s input autoformer as it is out of the circuit in MM mode.
FAQ #16: I want to use another external step-up transformer. Can I run it into my MM input with the load set for 47 kOhms?
A: Sure thing! You can totally run an external MC step up transformer and run that into the Steelhead MM input and set the load for 47 kOhms.
FAQ #17: I have an XYZ Model Blah Blah cartridge. Where do I set the loads? Which in put do I run it into? Where do I set the GAIN?
A: GAIN is GAIN. It doesn't care whether it is an MC or MM cartridge or an external step up transformer. Usually MM cartridges are going to be on the lower gain settings, like around 40dB of gain in a phono stage, and MCs on the higher gain settings, like around 60dB of gain.
Usually you'll see MM cartridges with a typical output of 1 milliVolt. MC cartridges maybe typically have about 0.5 milliVolts, for example. You'll have to see you much gain you need in your system and set the GAIN for as little as you can get away with. If you have cranked your preamplifier's Volume Control all the way up and you still can't play loud enough, then switch the GAIN up on your phono stage. What you don't want is MAX GAIN (and MAX NOISE) in your phono stage and then you line stage's Volume Control is barely cracked open at 9 o'clock.
LOADING also, doesn't care where you set the gain. You can set the loading for any cartridge or external step up transformer wherever you want to. You will never harm anything or blow anything up. The loading resistor helps damp high frequency resonances of cartridges (and other inductors). Adding capacitance to low impedance cartridges will have no audible effect. Most MM cartridges are going to require a standard 47 kOhms resistive load setting with some capacitance added in parallel with the resistor. You would ultimately also want to add the cable capacitance in your calculations. Read your Manley Steelhead Owner’s Manual as there is lots of info about this topic in your manual!
Always refer to your cartridge manufacturer's website or owner's manual for the suggested load and then set your Manley phono stage to that load setting or as close to it as possible.
"DC Resistance" and "Internal Impedance" refer to the measurement of the winding inside the cartridge and that is NOT what the recommended load setting is.
If it is not clear on the cartridge maker's website or owner's manual what the Recommended Load for their cartridge is, please contact the cartridge manufacturer and have them clarify what the recommended load for their cartridge is. We are not going to know that! We would have to Google it just like you will. But we can provide lots of choices and flexibility to set the load close to what you need.
And again, being exactly on the number they suggest or being a few Ohms different is not going to make or break anything. All of these load settings have a very very subtle effect and they are difficult to even hear sometimes.
So relax, and listen, and enjoy your music!
FAQ#18: On the newer Steelheads, what inputs are used for moving magnet and which ones are used for moving coil?
Sorry for the confusion.
We are trying to stop labeling MM or MC per se and instead describe what is really happening.
The 3 inputs themselves do not care if a MM or MC cartridge is plugged in.
Loading is set on the loading switches and GAIN is set on the GAIN switch.
As of late-2020, the new unit labels show:
1R was previously labeled MM
2Z was previously labeled MC1
3Z was previously labeled MC2
What is really happening is we have three inputs:
1R = LOAD happens via the resistors (Resistive Loading)
2Z = LOAD happens via the AUTOFORMER (Impedance Loading)
3Z = LOAD happens via the AUTOFORMER (Impedance Loading)
You can set the GAIN independently.
FAQ#18a: On the newer Steelheads, why did you change the resistor values?
Before mid-2020, the Resistively Loaded selections were 25, 50, 100, 200 and 47000 Ohms.
The “MC” or auto-former load choices were: 25, 50, 100, 200 and 400 Ohms. Sorry it took us about twenty years to realize that we could change the resistor values to provide less overlap and duplication, so now the resistor loaded values are 25, 50, 100, 200 and 47000 Ohms. We also stopped forever tying the resistor loads to MM cartridges as loading is loading and any cartridge can be loaded with any load (although typically Moving Coil cartridges receive lower value loads. However since there are even more exceptions to the old conventions these days, let’s just call things what they really are, Amplification amount is “GAIN”. Resistive loading is “R”. And Impedance matching determined by the autoformer is “Z”, the symbol for Impedance.
FAQ #19: My remote is not working. Send me a new one.
All remotes are paired up when they ship out. However, if at some point, if both UP and DOWN buttons get pressed at the same time, it will un-pair the remote and it will need to be re-paired. Follow the pairing procedure in your REMORA REMOTE manual to mate it up again.
FAQ #20: What do those red LEDs in the Steelhead audio chassis indicate?
A: They show you which input is selected.
Input 1R = MM = Both ON
Input 2Z = MC1 = Left ON Right OFF
Input 3Z = MC2 = Both OFF
Watch this handy video for a demonstration.
FAQ #21: Help! I live in a very humid climate, and the front panel loading switches on my Steelhead have become difficult to turn. How do I replace the internal connecting rods?
A. Watch this video! ————->>>>
